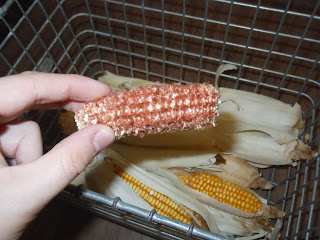
First you will need to find some dry corn. I got this from the field in front of our house RIGHT after it was harvested. Since harvest was early (and pretty dismal) this year I was able to get these before school started so I had plenty of time to think over this year's crafts.
 |
| If you are looking in a freshly harvested field for corn make sure it is still on the cob as shown here |
Some cobs may be different colors they are also good for crafting if you want...I'm not really into corn cob crafting so I just pitch these after taking the kernels off.
To remove kernels you should just press them to the side with your fingers, twisting them between your hands works too but you get a lot of silt and dust that way.
OR...you can press each row down ward and work around the cob in a circular motion.
I have two crafts going and since the corn harvest was not so good this year, after shelling the corn I only had about 5 cups of kernels from my basket full of cobs so...to save space I put an upside down measuring glass in the bottom of my large clear vase. I am not a photographer, sorry, my pictures stink.
After filling the vase, and topping it with a candle I was ready to put Carly down for a nap and fold the laundry. She obviously is into crafting...just look at that face!
 While Carly was down for a nap I decided to get out my fall stuff.
(and I didn't do the laundry, I just put it in the bedroom so the
pictures looked nicer)!
While Carly was down for a nap I decided to get out my fall stuff.
(and I didn't do the laundry, I just put it in the bedroom so the
pictures looked nicer)!If you think the picture of Carly and Maggie on the right side is cute you should check out my friend Jessie Hoag at www.jessicahoagphotography.com I hire her to do all my family photos. She is an amazing photographer and so good with kids, animals and husbands.
Second Corn Craft: Vase, yeah I get it...why turn the vase into a candle holder when you could just use the vase....as a vase. Because it's more fun that way!
Get a cute jar or bowl or vase or something. I chose an old Ball Ideal jar because I'm from the country and I like it that way. (song lyric pun intended)
The Pampered Chef Measure All insert fit except for the top part, so I cut it off.
JOKING!! Mom, you should start breathing again, I promise I didn't cut any PC apart!
The sippy cup was too wide to fit and the glass fit but was too tall. This is beginning to sound like a nursery rhyme.
The block cylinder did fit, I put it in upside down so it would hold water. Please disregard Carly's full sippy cup. She was trying to help but really just playing dress up and wrecking the house with the left over corn parts. Can you see her below in her pink and leopard print coat and hat? She is also wearing red sweats, and her mud boots. She has her mother's sense of style that's for sure.
Put your had over the opening of whatever you found to fit in your "vase" and pour the corn in around it.
If the corn doesn't cover all the way it is okay, you will cover it in burlap or a ribbon or something.
Now it is time to make them pretty!
Measure your burlap or ribbon or whatever you are using. I had some left over burlap from another project so I cut some into a thin strip and measured it around the vase/candle and cut it so it met up perfect.
Then I followed along where the corn and candle meet with a little white school glue. I always use glue that dries clear, you could also use hot glue but white glue peels off easier and you typically won't melt your fingers off.
I pressed it on really well all the way around and applied an extra dab at the end where the ends met up.
I did the same with the jar/vase except I wanted it to look less perfect so I frayed the ends and tied it in a loose knot then glued it down so it would stay.
If you get too much glue or it doesn't look just perfect don't sweat it. If someone comes to your house and checks your home made vases to see if you did it to THEIR standards you need to find new friends who are less critical of awesome crafts made by real people.
Add a few sunflowers from the driveway and you have a nice looking centerpiece!


No comments:
Post a Comment